Building a Team
Now let’s take a look at what we need for a successful photo shoot. We already talked in more detail about picking models, setting up the photo shoot, and paying for everything in Chapter 1. So, here’s a quick rundown of the people you need on your team:
The First Thing We Need Is the Model
Getting the right model for the job does not mean picking the first pretty face you see on the street. This works for some images, but a good model is someone who is flexible with their poses and, most of all, has character. Somehow, I don’t like the “pretty” models. I always want something offbeat in my models, something that sets them apart from the crowd. When you go through my portfolio, you will see a lot of pretty girls (and guys), but I selected them because of their other qualities: the way they act in front of the camera, the way they dress when they come in at the casting/test shoots, and so on. Often I can see in the blink of an eye if a model is what I am looking for.
“Now,” I hear you ask, “how about some examples?” Well, I thought about this and I want to spare you the boring headshots, so I thought we’d do it a bit more in sync with the book. For example, one of things I always ask a model to do during a test shoot is to jump. We use a lot of motion in our shoots, and a model that moves freely in front of the camera is a huge plus for me. So, here is a shot of a jump from a test session we did with Loes, a model we now work with a lot.
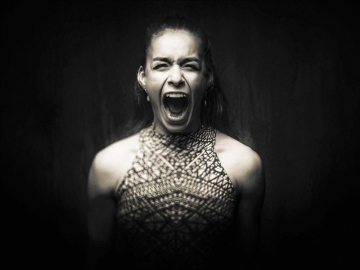
Expression is also very important, so it’s not uncommon for me to ask a model to scream in front of the camera. Often, it’s a way to break the ice, and for me, it’s a great way to see what kind of expression the new model can/will bring to the set. A model that is restrained will often also be less “free” in front of the camera. So this is actually a pretty good way to test a model. It won’t give you the best images, but it does show you how free a model feels in front of the camera.
The Makeup Artist (MUA)
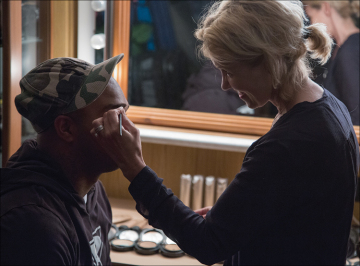
Now that we have our model, it’s up to the next vital part, the makeup artist. Put a model in front of the lights without makeup and...well, she will look very, very bad. Add some makeup, and there we go.
The first problem a lot of starting photographers experience is the “shine” on the face. Whatever they try, they don’t seem to be able to figure this out. In reality, it’s simple: when you put someone in front of strobes without any makeup, the skin reflects the light. So, we need to put something on the skin—in most cases, a powder that will remove the shine. The correct powder is chosen based upon the model’s skin. So, if you can’t afford a makeup artist, at least make sure you have some of this powder in your studio, with a brush to apply it to your model’s face. It makes a huge difference.
But, this is not where the job of a good MUA stops. They are often the creative force behind your shoot. They will come up with ideas that you probably would never think of, or enhance the ideas you have. The moment you start working with an MUA, you’ll see an immediate jump in your image quality.
Now, some makeup artists also do a little bit of hairstyling, however when you have the chance, try to get a hairstylist, too.
The Hairstylist
Now it’s going to get crazy creative. Hairstylists are the Mad Hatters on the set. They are the people that make the creative juices go BOOM! They can transform an okay model into something that will make your jaw drop.
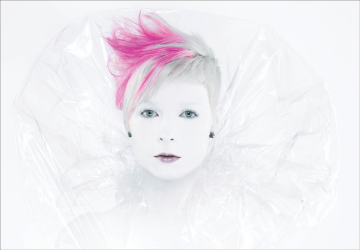
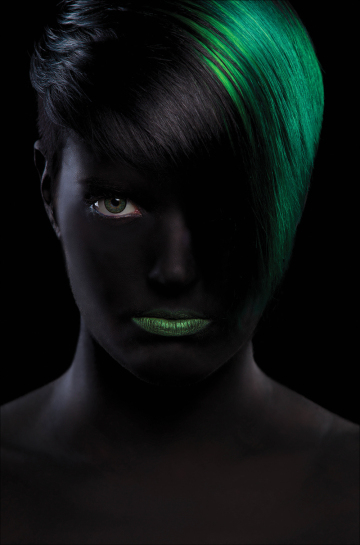
Combine the hairstylist with a good makeup artist and you can get stuff like the images you see here. And when we do something in white, we have to do something in black, as well.
Hair and makeup are often underestimated, just as styling is. In the hectic pace of a photo shoot, people seem to forget that, in the end, it all boils down to the final image. Often, I see images that are very nice but don’t have that “Wow!” factor that they do when people just give a little bit more attention to stray hairs, a little bit better makeup, etc.
A successful photo shoot is a collaboration between many people, ranging from the photographer and model to the makeup artist, stylist, and hairstylist. Now, I know that a lot of people cannot pay for a team like this (and we also don’t have teams like this most of the time). But, even without a full team, it’s very easy to, for example, just wet the hair a little bit to make sure it’s not “fluffy,” or just add a little bit of gel or hairspray to the hair to make sure it stays in place. It’s all those little things that you can do yourself, or that a team normally does, that will make your image go from okay to “Wow!” And now for the final part of our team:

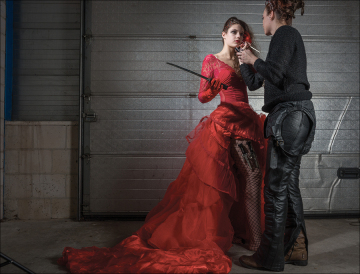
The Stylist
If the hairstylist is the Mad Hatter, the stylist is the über Mad Hatter—the one that puts the whole team into overdrive. These people are the creative engine behind a shoot. But, to find a good one is very hard and often expensive.
Stylists are able to throw together stuff that make you think, “That will never, ever go together,” and when you see the end result, you will say, “Oh my! What just happened?” Now don’t get me wrong, styling a shoot is not just throwing some stuff together and hoping it will work out. It’s much, much more. It’s about knowing what goes together, knowing how to pose your model, and knowing how to light the scene.
Often, getting a stylist isn’t easy. I always tell people that there are a million models out there, about a thousand makeup artists, and maybe one good stylist. Now, I do exaggerate a little bit, but it’s actually pretty close to the truth—there really are not that many stylists out there, and the reasons are very simple:
First of all, being a good stylist means being almost freakishly creative, but it also means being able/willing to spend a lot of money on accessories, clothing, fabrics, etc.

The stylist we work with in our studio literally has moved to a bigger house to be able to store all the materials she uses. She also creates 90% of the dresses herself and takes them apart again after one shoot. She does not want to use something more than once (maybe twice). This means a lot of dedication and money that is spent. It also means that a lot of stylists won’t work for free (Time For Print [TFP]—more on this back in Chapter 1), however I strongly feel that they are worth every cent and can really lift your work to the next level.
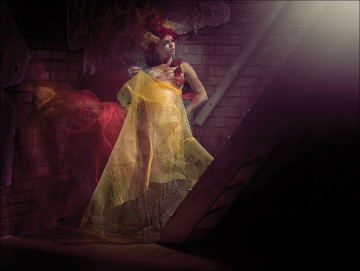
Let’s look at a few images to see how easy it can be to add some flair to them without breaking the bank, and imagine these images with a model in just jeans and a tank top.
This shot was actually not as easy as it looks. The cup and saucer were bought by the model, and it was actually sold as a hairclip. However, whoever designed it must have had a bad day, because the cup and saucer were way too heavy to stay in the hair. In the end, we taped (yes, I’m serious) the cup and saucer to the hair of the model to keep it steady. One good tip: If you use tape, make sure you are nowhere nearby when the makeup artist removes the prop from the hair.
All we needed for this image was a strong face, some nice basic makeup, and a leaf from a plant that was in our studio at the time. It’s all very simple, but because of the proper placement, and the composition, and position of the hair, it all works.
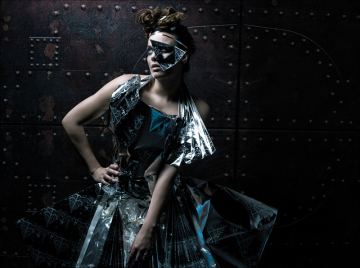
This next dress (above right) looks expensive, right? Well, actually, it’s just Christmas wrapping paper and some tape to hold it together. It was put together by Nadine (our model and stylist) in about two hours. Total cost: $0 (well, okay, just the cost of some tape).
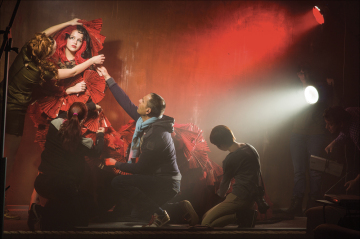
Below right, we used some fabric the model bought at the market, some chicken wire, and some crazy makeup. Add a little bit of smoke and some backlight and you’re done (more on the smoke back in Chapter 2, and lots more on lighting later in the book). Overall, the costs were less than $20.
In most model photography books, the writer only touches on one topic needed for a photo shoot, like “How to Operate Your Strobes” or “The 1,001 Poses Book.” That doesn’t work for me. In the end, we all know how a strobe works, what a reflector does, etc. We don’t need an extended instructional manual to get the feeling for a photo shoot.
A successful photo shoot is much more. It’s the balance between the subject, the light, the makeup, the hair, and the styling. To be totally honest, although the technique you put into the shot is very important and can still make or break the shoot, you can be the best lighting wizard in the world, but if you don’t take care of the other points, you’ll never, ever create something that will make people go crazy.
In this book, I’ve tried to give you the most complete rundown of a successful photo shoot that I can and you’ll find many tips on how to create such a shoot. I also show you lots of examples. As you work your way through the book, you’ll see a variety of styling examples, from the simple to the complex. So, don’t panic after reading this chapter. Don’t think, “I can never pay for all this, so I’ll stop reading.”
You don’t have to start out with the complete team from Day 1. However, if you know a little bit about styling due to the tips in this book, you’ll see your images improve very quickly. Just changing your model from jeans and a tank top into something more interesting often transforms your images into something that draws more attention to your work. The nice thing about getting more attention for your work, especially online, is it means that more people will want to work with you.
Just like you, there are many makeup artists, stylists, and hairstylists out there that are just starting out, building their portfolio, and they’re looking for ways to do this. If you stand out with your images, the chance that they will approach you (or react positively when you approach them) will grow, and if you start out with this team, you’ll quickly see the entire team grow and the work improve a lot. From then on, well, who knows what will happen.
Keine Kommentare:
Kommentar veröffentlichen